2. Required (and Recommended) Parts and Tools
Parts
The table below lists the parts required for assembling our system:
Part
|
Adafruit Part
|
Alternative Part(s)
|
Price Range |
|---|---|---|---|
ESP8266 Breakout
Board
|
Adafruit Feather
HUZZAH with ESP8266
WiFi (part 2821)
|
Various NodeMCU
boards
|
$4.00 - $15.95 |
TSL2591 Breakout
Board
|
Adafruit TSL2591
Digital Light Sensor
(part 1980)
|
N/A
|
$6.95 |
Lithium Ion 3.7v
350mAh battery
|
Lithium Ion Polymer
Battery 3.7v 350mAh
(part 2750)
|
Any 3.7v with
JST-PH connector
(for Adafruit
ESP8266 board
only)
|
$6.95 |
Half-size
breadboard
|
Half-size breadboard
(part 64)
|
Various
|
$2.00 - $5.00 |
Micro-USB to
USB cable
|
USB cable - 6”
A/MicroB (part 898)
|
Any with data
connection
|
$2.95 |
Breadboarding
wires
|
Breadboarding wire
bundle (part 153)
|
22-26GA solid
core wire
|
$6.00 |
| Total | $21.90 - $43.80 |
And, here is a picture of the parts:
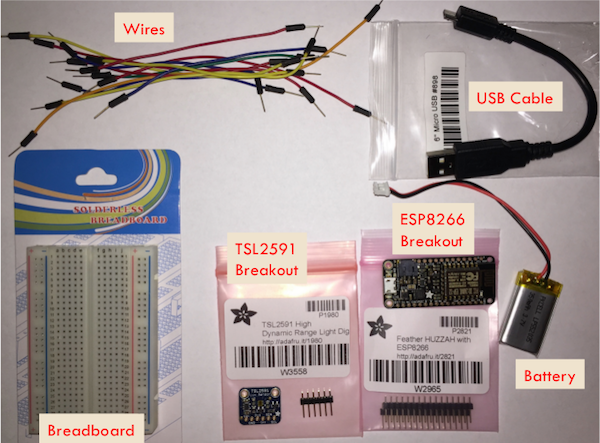
Details
Here are some details about each part. If you are looking to save money, see the options discussed for each part.
- ESP8266 Breakout Board
- The board from Adafruit is expensive, but high-quality and well-documented. It also has a built-in battery connection and can charge the battery via the USB. You can also use boards built for the NodeMCU project. These can be found on Amazon for around $9 or directly from Chinese suppliers for as cheap as $4 (e.g. gearbest.com or alibaba.com). As the NodeMCU boards do not have a built-in battery connection, connecting a battery is a little more complex (and beyond the scope of this Hackathon).
- TSL2591 Breakout Board
- This board is specific to Adafruit. It includes some extras, like a voltage regulator. Adafruit and SparkFun also have a breakout board for the TSL25**6**1. This light sensor also uses the I2C bus, but it is not as sensitive as the TSL2591.
- Lithium Ion Battery
- You only need this if you have the Adafruit Feather HUZZAH board and are going to run the system disconnected from the USB (most remote sensing scenarios). You can also use batteries with a higher mAh rating.
- Half-size breadboard
- This will fit our two breakout boards. If you have more sensors you want to connect, you might consider a full-size breadboard. These are available from many suppliers. If you are buying for a class, you might find quantity discounts (e.g. we found 10 boards for $1.60 each).
- Micro-USB to USB cable
- This connects the ESP8266 breakout board to the Laptop/PC. You can use just about any such cable (you probably have a few laying around your house), but it must have both data and power connections.
- Breadboarding wires
- These are pre-cut male jumper wires that we will use to make the connections on the breadboard. You can also just get a spool of insulated solid wire from 22 to 26 gauge and use a wire stripper and cutters to get wires of the right size.
Recommended Tools
Here is a picture of the tools we recommend to build and test the system:
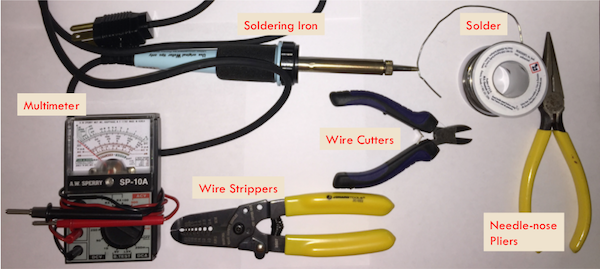
Details
- Multimeter
- A multimeter (or multitester) is an instrument that measures voltage, current, and resistance. As you build your system, you can use the resistance measurements to check whether connections are made (should be either resistance of zero or infinity). You may also need/want to check voltages. The multimeter pictured is an old analog one. There are also new digital meters available for around $25.
- Soldering iron and solder
- Adafruit provides the headers (a strip of plastic containing pins) separate from their breakout boards. We need the soldering iron and solder to connect the headers to the boards. This allows us to insert the breakout boards into the breadboard. If you are participating in a group hackathon, this step may have already been done for you.
- Wire strippers and wire cutters
- If you are not using the pre-cut jumper wires, you will need to cut and strip your wires. You may want to have these tools handy anyway. Most wire strippers also can cut wires, but I find it helpful to have a separate tool.
- Needle-nose pliers
- Although not strictly necessary, these can be helpful.
Now, we are ready to begin the hardware assembly.