4. Software and Firmware Install
We are now ready to start installing software on our board, over the USB connection. For this, you will need a Mac, Linux PC, or Windows PC. We have only tested the firmware procedure on Mac and Linux, so those systems are recommended. However, others have successfully installed MicroPython from Windows, so it should work.
In the instructions that follow, we will use the term “host computer” to mean your PC/Mac/Linux box and “ESP8266” to mean the ESP8266-based system you have assembled on the breadboard.
Software Prerequisites
Python
On your host computer, you will need an installation of Python 3, version 3.4 or later. As described below, you will be adding a few packages to your Python install. Rather than add these packages to your system-wide Python install, we recommend installing them into a virtual environment. See the Python documentation page for venv for details.
Erasing and flashing the firmware is done through a utility called
esptool.py [1]. You can install it via pip with the command:
pip install --upgrade esptool
If pip on your system defaults to Python 2, then use pip3 instead.
We will also use mpfshell, a shell-like utility for moving files between the
ESP8266 and the host computer. [2] It is available on GitHub: https://github.com/wendlers/mpfshell.
Install it with:
pip install git+https://github.com/wendlers/mpfshell
We will use the ThingFlow framework for writing some of the software running on
the ESP8266. Please download or clone the ThingFlow repository on GitHub:
https://github.com/mpi-sws-rse/thingflow-python. Note that we will not be using
the packaged version of ThingFlow available on pypi.python.org. That version is only for
the standard CPython implementation. We will be using the code in the
micropython subdirectory of the ThingFlow source tree.
MicroPython Firmware
You can download the latest version of the MicroPython firmware for ESP8266 from
here: http://micropython.org/download#esp8266. You will want the latest stable
firmware version [3]. Since the name of the firmware file will change over time,
we will refer to it as esp8266-YYYYMMDD-vX.Y.Z.bin in any commands. Just substitute
with name of your image file.
Mac-specific
If you are using a Mac, you will need to download a USB to UART bridge driver from Silicon Labs. This will allow your Mac to send serial communications for the Silicon Labs USB adapter chip on your ESP8266 board. The driver is available from their website: https://www.silabs.com/products/mcu/Pages/USBtoUARTBridgeVCPDrivers.aspx
For interacting with the Python REPL running on the ESP8266, you will use the
screen program. It comes pre-installed on MacOS.
Linux-specific
You should not need any drivers for the serial connection. You will want to add
your user to the dialout group so it can access the tty device for the serial
connection. Replacing MYUSER with your user id, the command is:
sudo adduser MYUSER dialout
We will be using the GNU screen program to interact with the Python REPL
running on the ESP8266. If it is not already installed, you will need to do so.
If you are running a Debian-based distribution (Debian, Ubuntu, Raspbian), then
you can install it via:
sudo apt-get install screen
Windows-specific
You will need the PuTTY program to interact with the Python REPL running
on the ESP8266. It is free and available at http://www.putty.org.
As stated above, we have not attempted this process with a Windows host. We suggest that you follow the instructions here: http://www.instructables.com/id/The-Super-Easy-Micropython-ESP8266-Guide-No-Guessw/?ALLSTEPS.
The rest of the instructions below are for Mac and Linux. You should be able to
follow along using the Instructables guide as a reference. You will use PuTTY
instead of screen. Of course, the command options will be slightly
different.
Testing Your Connection
With the prerequisite software installed, you can now connect your ESP8266 and
verify that it can talk to your host system. Using the microUSB to USB cable,
plug it into the USB port. Now, look for a new serial tty device in your
/dev directory. On Mac, it should be called /dev/tty.SLAB_USBtoUART.
On Linux, it should be called /dev/ttyUSB0. The device will only be
present when your ESP8266 board is plugged in.
Now, run screen as follows (substituting TTYDEVICE with ttyUSB0 or
tty.SLAB_USBtoUART):
screen /dev/TTYDEVICE 115200
The 115200 is the baud rate. Now, press the reset key. You should see some
characters, either a prompt or some garbage. If you get garbage, you might
try a baud rate of 9600. Do not be worried at this point if you only see garbage,
we are going to rewrite the firmware anyway. As long as you saw the tty device,
you should be OK.
Now, exit screen (pressing Control-A k and then “y”), and run the reset
command in your terminal session. You are ready to install the firmware.
Installing the Firmware and Testing the REPL
We will use esptool.py to erase the old firmware and install the latest
version of MicroPython [4]. Plug your ESP8266 back into the USB port and run
the following from the command line:
esptool.py --port /dev/TTYDEVICE erase_flash
Now, install the new firmware with the following (substituting in the device name and MicroPython image file name):
esptool.py --port /dev/TTDEVICE --baud 460800 write_flash \
--flash_size=detect --verify -fm dio 0 esp8266-YYYYMMDD-vX.Y.Z.bin
If this step fails, you might try lowering the baud rate (e.g. from 460800 to 115200).
Next, we will use screen to connect to our board. From the command line:
screen /dev/TTYDEVICE 115200
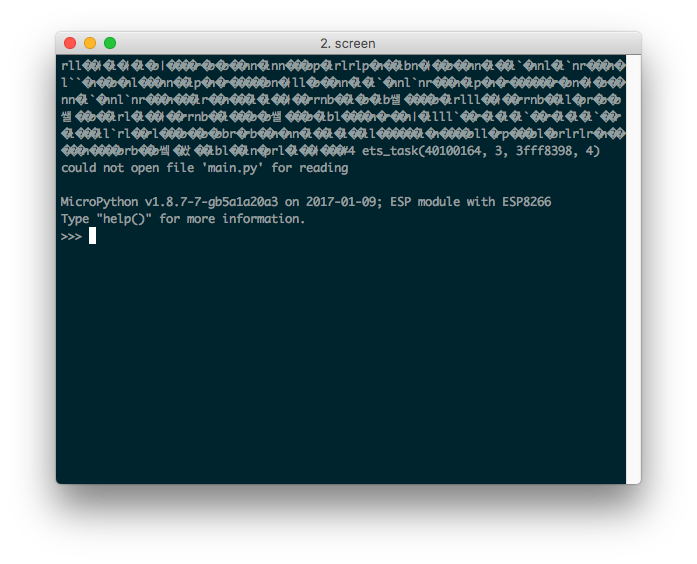
Now, press the reset button on your ESP8266 board [5]. In your screen session,
you should see some garbage characters followed by a version string and a
prompt. For example:
You should now be able to type Python code in at the prompt:
>>> print("Hello, world")
Hello, world
>>>
Congratulations, you have MicroPython running on your ESP8266! If you had problems, you might try looking at the troubleshooting hints provided in the MicroPython documentation [6].
Next, let’s write an application for our board.
| [1] | https://pypi.python.org/pypi/esptool/1.3 |
| [2] | MicroPython has a web-based interface for transferring files
over the WiFi network. However, we have seen some problems with using it
and recommend using mpfshell |
| [3] | At the time this is being written, the latest stable version is 1.8.7,
and the firmware image filename is
esp8266-20170108-v1.8.7.bin. |
| [4] | You can also find instructions for this in the MicroPython documentation. The relevant section is at https://docs.micropython.org/en/latest/esp8266/esp8266/tutorial/intro.html |
| [5] | On both the NodeMCU and Adafruit boards, the reset button is labeled “RST”. You can use this button to force a reboot of the system. This is useful to get it to a known state (recommended after plugging into the USB connection). |
| [6] | https://docs.micropython.org/en/latest/esp8266/esp8266/tutorial/intro.html#troubleshooting-installation-problems |