7. Projects
We now sketch out several projects you can build starting with your system. These include interfacing additional sensors, software projects, as well as incorporating the system in a larger application. Currently, this section is just a sketch. Over time, we will fill out more details.
Sensor Data Visualization
Graphing Light Sensor Data in Jupyter
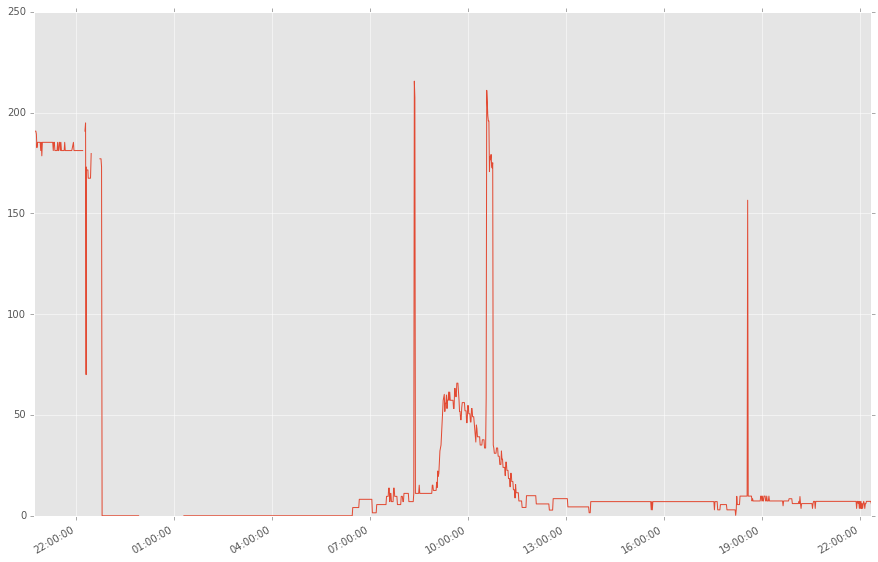
Given the CSV files we have generated, it is quite easy to use Jupyter and matplotlib to graph the light sensor data over time. Here is an example plot of light sensor data gathered using the system we have described:
Realtime Dashboard of Light Sensor Data
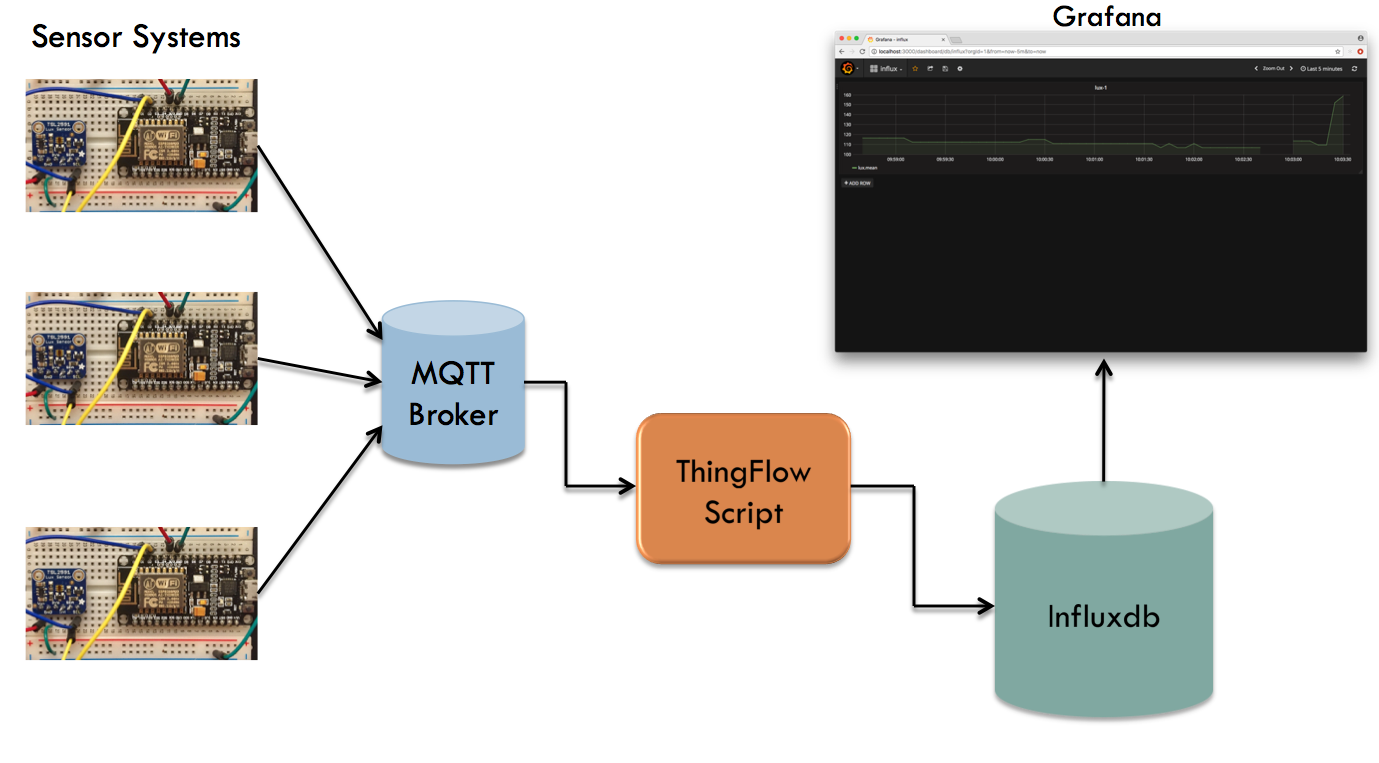
Grafana is an open source web application for displaying time series data. You can use it with Influxdb (a time-series database) to store and visualize the light sensor data. Here is a picture of the workflow:
The setup for Influxdb and Grafana is pretty straightforward. You can find a
ThingFlow script to read sensor events from a MQTT broker and write them to
Influxdb in the example_code directory of this documentation’s
Git repository.
The script is called server_mqtt_to_influx.py. Run the script with
--help to see the command line options for configuring the connections
to the broker and Influxdb.
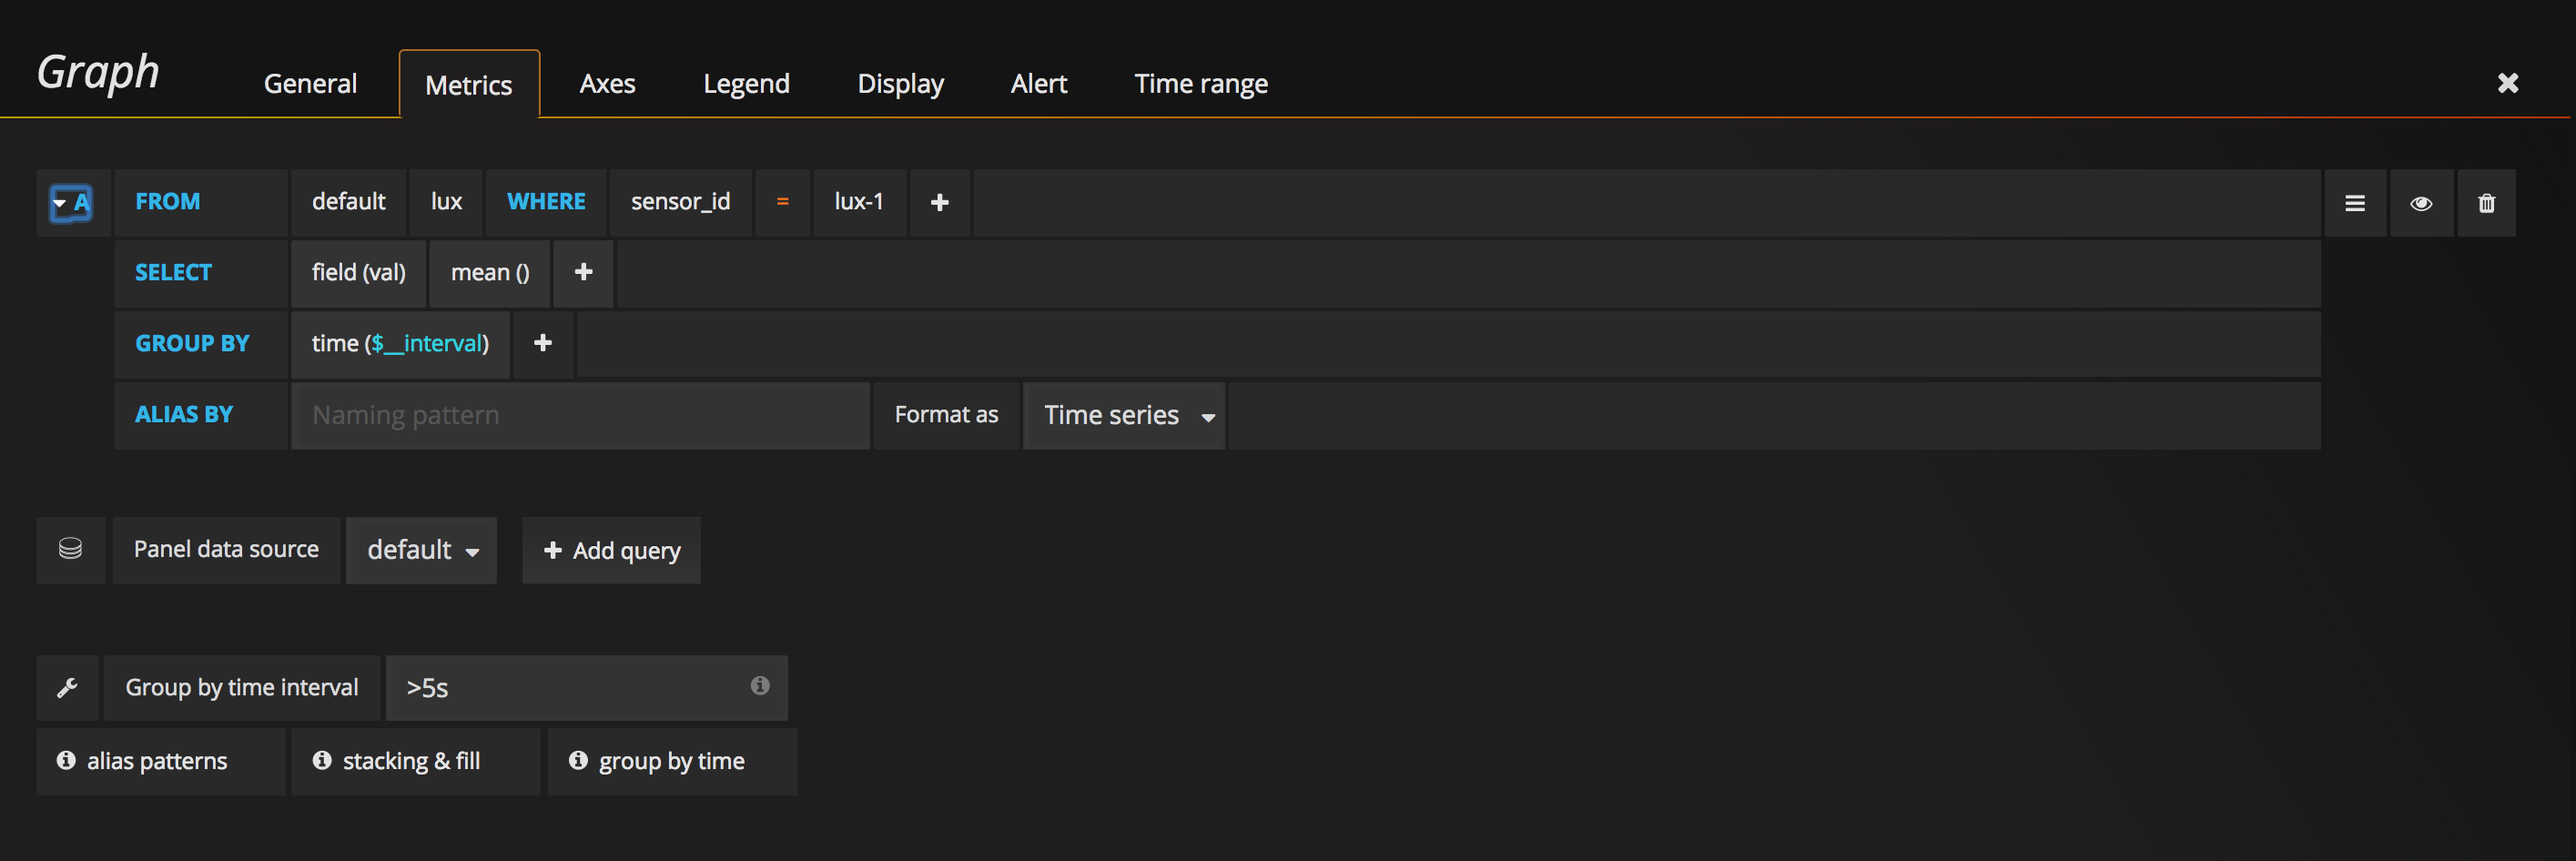
The only non-intuitive part of the setup was the Grafana chart configuration. Be sure to set the “Group by time interval” parameter. For a five second sensor sample interval, use “>5s”. Here is a screen shot of the full configuration I used:
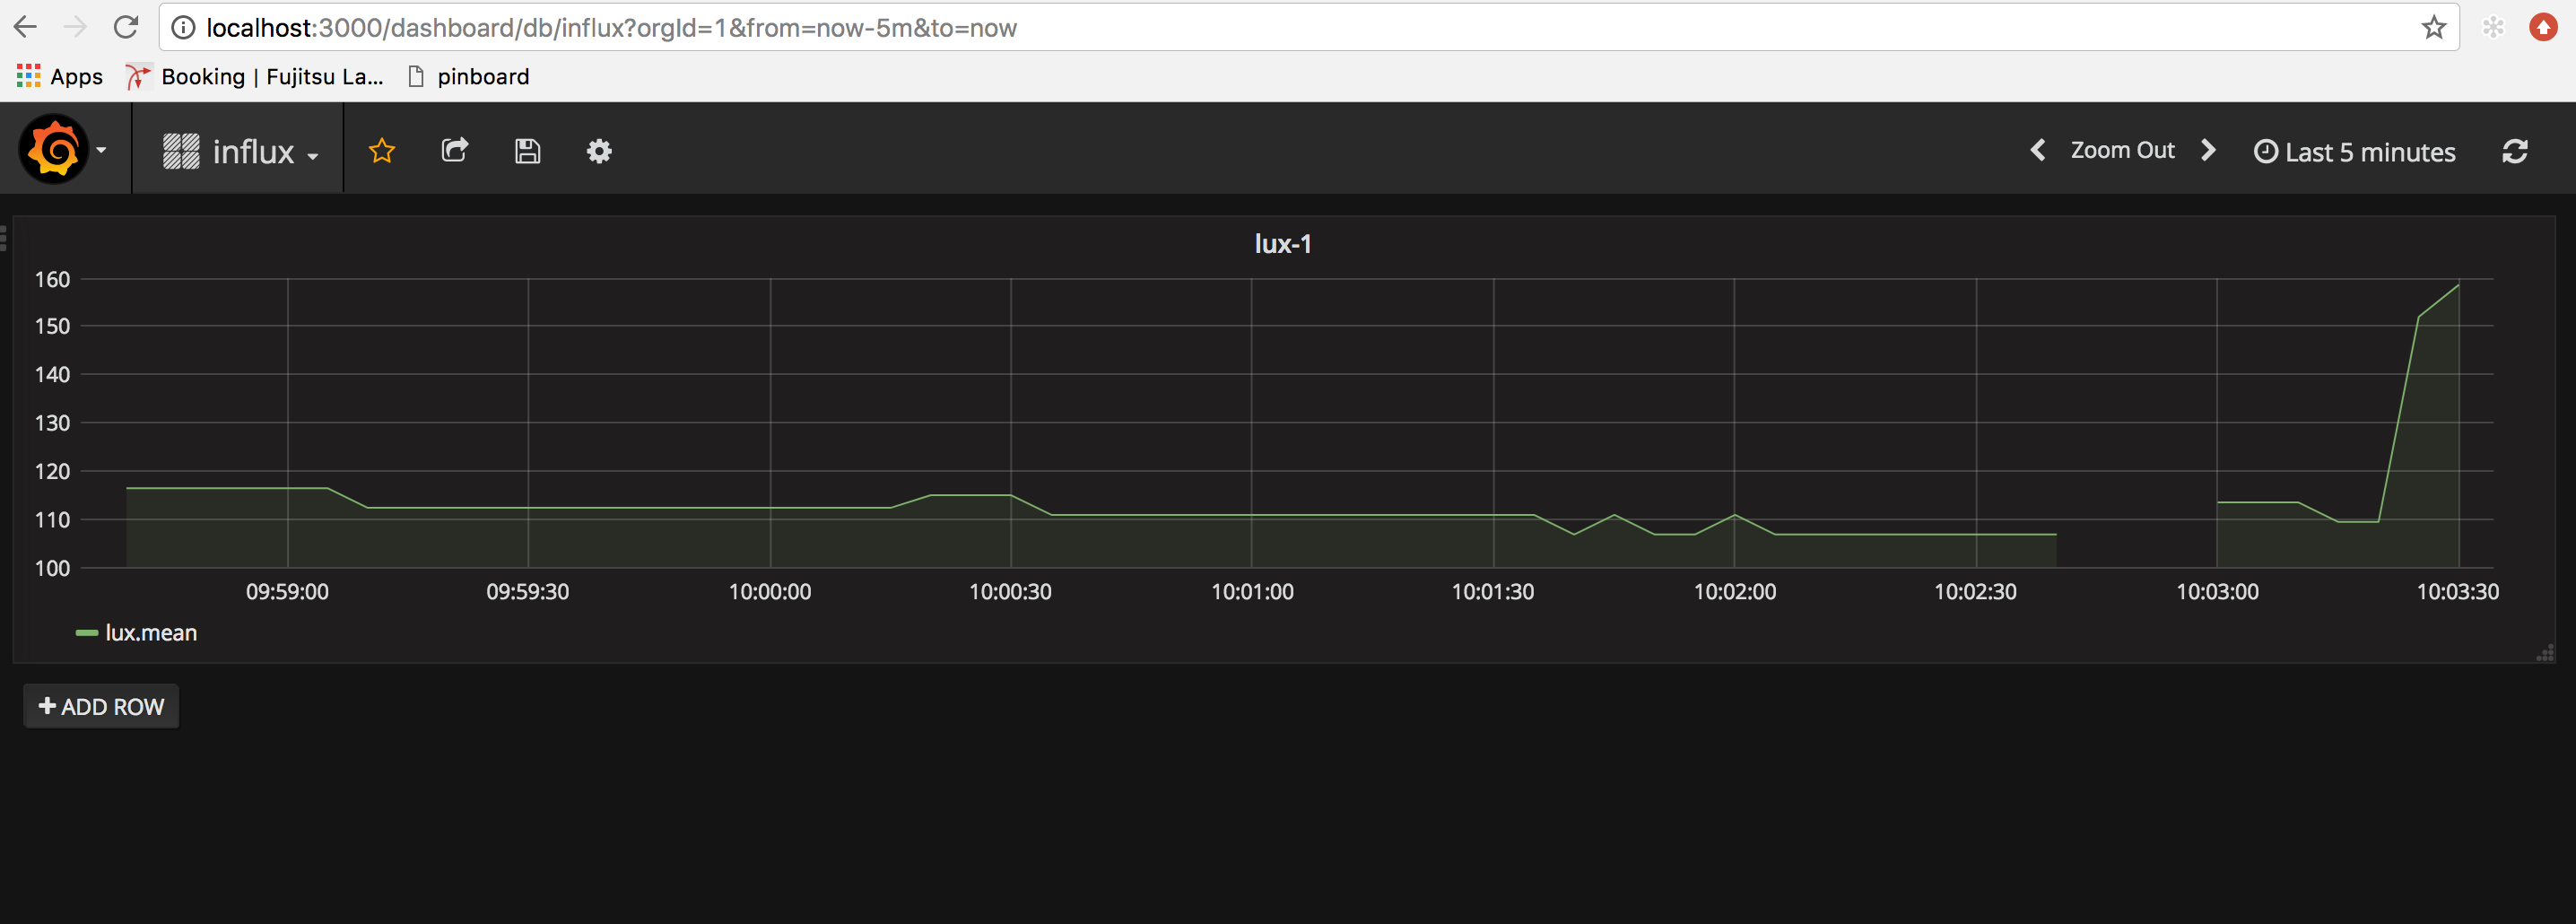
A Grafana screenshot showing a chart of the light sensor data:
Lighting Replay Application
See https://github.com/mpi-sws-rse/thingflow-examples/tree/master/lighting_replay_app. This is an application which uses captured light sensor data to train a Hidden Markov Model. This model then is replayed when you are not home, to turn lights on and off in a realistic manner.
More Sensors
Temperature Sensor
There are many temperature sensors on the market. One well-documented sensor is the MCP9808 breakout board from Adafruit. Like our light sensor, it uses the IC2 bus for communication. To use the sensor, you need four connections: ground, power, SDA, and SCL. Power and ground can be connected to the power and ground lines of your breadboard or directly to the associated pins on the ESP8266. For the SDA and SCL pins, you can either connect them directly to the ESP8266 or daisy-chain them (connect in series) through the Lux sensor. Assuming you already have the TSL2591 sensor wired to your ESP8266, here are the connections you will need:
| Signal Name | Location of Source | Location of Destination |
|---|---|---|
| GND | Bottom row of
breadboard
|
MCP9808 board
pin #2 from left
|
| 3V | Top row
of breadboard
|
MCP9808 board
ping #1 from left
|
| SDA | TSL2591 board
pin #5 from left
|
MCP9808 board
pin #4 from left
|
| SCL | TSL2591 board
pin #6 from left
|
MCP9808 board
pin #3 from left
|
ThingFlow for MicroPython has a sensor class for the MCP9808 located
in micropython/sensors/mcp9808.py. Here is an example MicroPython
REPL session where we sample both the lux and temperature sensors using
ThingFlow:
>>> from thingflow import *
>>> from tsl2591 import Tsl2591
>>> from mcp9808 import Mcp9808
>>> lux = Tsl2591()
>>> temperature = Mcp9808()
Read manufacturer ID: 0054
Read device ID: 0400
>>> sched = Scheduler()
>>> sched.schedule_sensor(lux, 10, Output())
<closure>
>>> sched.schedule_sensor(temperature, 10, Output())
<closure>
>>> sched.run_forever()
('tsl2591', 108, 162.221)
('mcp9808', 108, 26.1875)
('tsl2591', 117, 162.221)
('mcp9808', 117, 26.1875)
('tsl2591', 126, 1.5096)
('mcp9808', 126, 26.1875)
Finally, Adafruit has a tutorial about using this sensor with MicroPython here.
Door Open/Close Detector
Adafruit describes a project to interface the ESP8266 to a door open/closed switch here: https://learn.adafruit.com/using-ifttt-with-adafruit-io/overview. It is Arduino based, but should be easily adaptable to MicroPython.
Accelerometer
An accelerometer opens up a number of interesting project ideas. For example, a
student at the Max Planck Institute for Software Systems built a machine
learning-based gait analysis application. She used an ESP8266,
the ADXL345 breakout board from
Adafruit,
MicroPython, and ThingFlow. A ThingFlow sensor for the ADXL345 is located
in the ThingFlow repository at thingflow-python/micropython/sensors/adxl345_upy.py.
The machine learning was done in Python with
scikit-learn.
Actuators
Turning on an external LED
Perhaps the simplest hardware interfacing is to an LED. There are many tutorials online about how to do this. You will need three connections: from a GPIO pin to the LED, from the LED to a resistor, and from the resistor to GND.
NeoPixel Strips
NeoPixels are addressable LED light sets available from Adafruit and others.
MicroPython provides a
NeoPixel “driver” library.
ThingFlow for MicroPython provides a convenient interface on top of this – see
thingflow-python/micropython/neopixel_writer.py.
Open-ended Projects
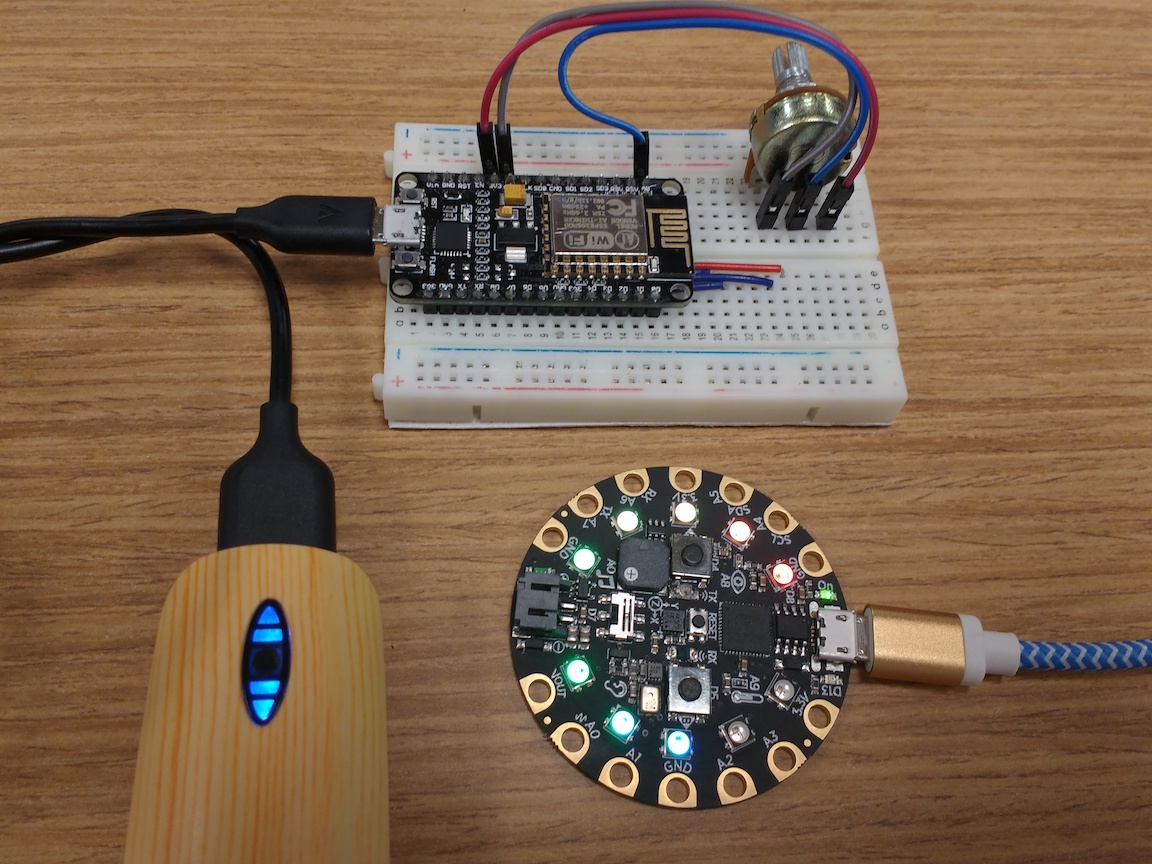
Adafruit Circuit Playground Express
The Circuit Playground Express (CPX) is a board from Adafruit that includes a Cortex M0 processor, temperature, motion, sound, and light sensors, NeoPixel lights, a speaker, and more. It runs CircuitPython, which is Adafruit’s port of MicroPython to their system.
There are a lot of applications possible with this kind of board. In the
directory example_code/cpx, Daniel Mizyrycki has graciously provided
code from a cool demo. He uses a potentiometer connected to an ESP8266
to wirelessly control the NeoPixel lights on the Circuit Playground Express.
Here is a picture of the demo in action:
Power Management
The ESP8266 has various power saving modes. If you have a simple sensor application that samples once a minute or less, you should be able to turn off the WiFi radio and put the board into a deep sleep mode. Some people claim that you can Run your ESP8266 for Years on a Battery, but there probably are complications in the real world. For example: How much power does your sensor consume? Can you turn it off programmatically? Can you avoid DHCP initialization when the radio is turned back on?
You can use a voltage divider to reduce the battery voltage below the 1.0V limit of the ESP8266 Analog to Digital converter. That would enable you to measure the voltage over time. Here are some instructions at Adafruit: https://learn.adafruit.com/using-ifttt-with-adafruit-io/wiring#battery-tracking.
On the software side, the ThingFlow scheduler optimizes samples to maximize the sleep time. The sleep can be easily changed to one of the deep sleep modes.
Using the ESP8266 as a WiFi Modem
The ESP8266 was originally developed to used in conjunction with larger microcontrollers. The intent was for the ESP8266 to provide WiFi capabilities, while the primary microcontroller provided the main processing. In fact, the original ESP8266 firmware included a Hayes-style (“ATDT”) modem command set over the serial port.
There are still hobbyist use cases for the ESP8266 as a WiFi modem. For example, you might have a larger Arduino system that does not already support wireless operation. Can you connect the ESP8266 to these kind of systems via its second serial port? Can you emulate some modem functionality in MicroPython?
Home Assistant Integration
Home Assistant is a Python3 open-source application framework for automating your home. Since Home Assistant already supports MQTT, it should be easy to integrate remote ESP8266 nodes into the application. Can you do it? What cool applications can you build?
Another Micropython/ESP8266 Tutorial
We recently found another tutorial about Micropython and the ESP8266. It is more focused on lower level sensors and has some interesting hardware projects. It is called “MicroPython on ESP8266 Workshop” and is available here: http://micropython-on-esp8266-workshop.readthedocs.io/en/latest/index.html.
Finally, we conclude with some advice for hosting a hackathon.