1. Introduction
Background
MicroPython [1] is an implementation of Python 3 that can on on small devices without a traditional operating system. It requires just 256k of code space and 16k of RAM. One of the microcontrollers supported is the ESP8266 [2], a low cost microcontroller with a 32-bit CPU, a built-in WiFi radio, and a number of input/output ports useful for interfacing with the physical world. Since the ESP8266 can run off a small lithium ion battery, it makes a great remote sensing and control platform. Complete development boards using the ESP8266 run anywhere from $3 to $16, cheap enough that you can deploy multiple systems.
Hardware Overview
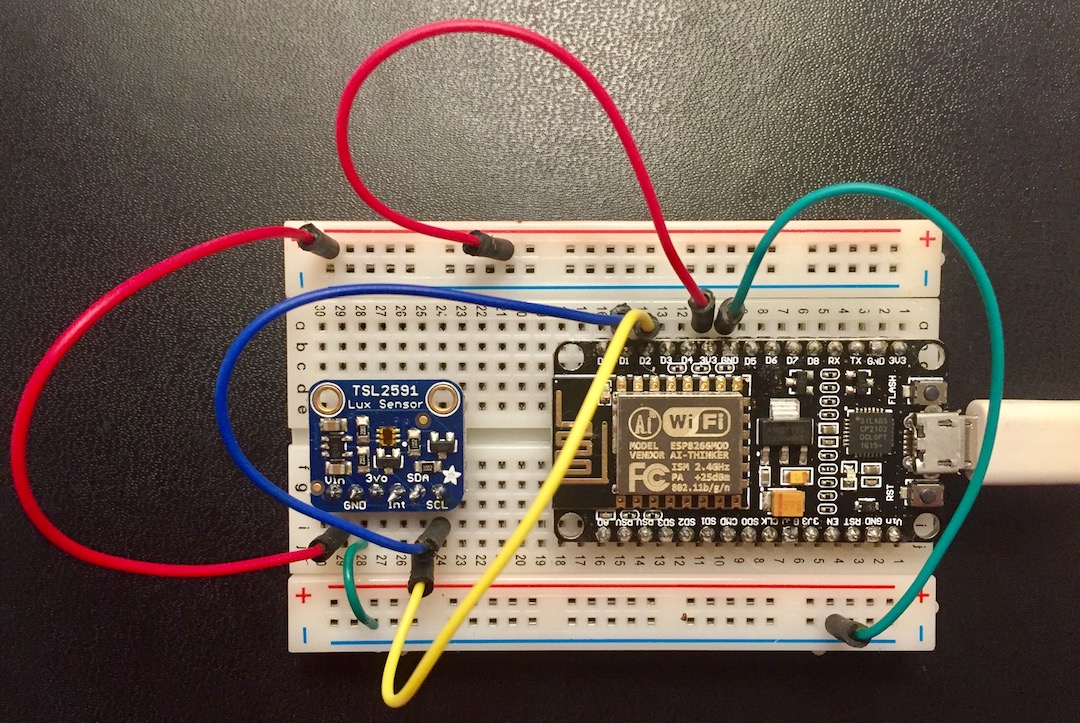
We will build a wireless system that combines the ESP8266 with a light sensor (the TSL2591 ambient light sensor from AMS). Each of these will be used via a breakout board – small printed circuit boards that combine multiple surface mount chips and provided easy connection points. The sensor and processor connect via a digital serial protocol called I2C [3]. This will involve connecting a total of four connections between the boards. We will facilitate these interconnections using a prototyping breadboard. The breakout boards can be plugged into the breadboard and then the wires stuck into the breadboard to connect the pins on the chips.
The breakout boards for the ESP2866 have a Micro-USB connector attached to a serial port on the processor. We will connect this to a laptop/PC, allowing for firmware updates, file transfer, and interactive communication.
Once the basic system is up and running, additional sensors can be added.
Software Overview
We will first update the firmware to use the latest version of MicroPython. Then, we can copy over a library module to read the light sensor. We can call it interactively via the Python REPL to sample the sensor. Next, we can copy over the ThingFlow framework and write a short program to periodically sample the sensor.
To use the system remotely, we will send messages over the WiFi radio. This involves setting up the credentials and sending messages via the MQTT protocol (MicroPython provides a library for this). We can set up an MQTT broker on the laptop/PC to receive these messages.
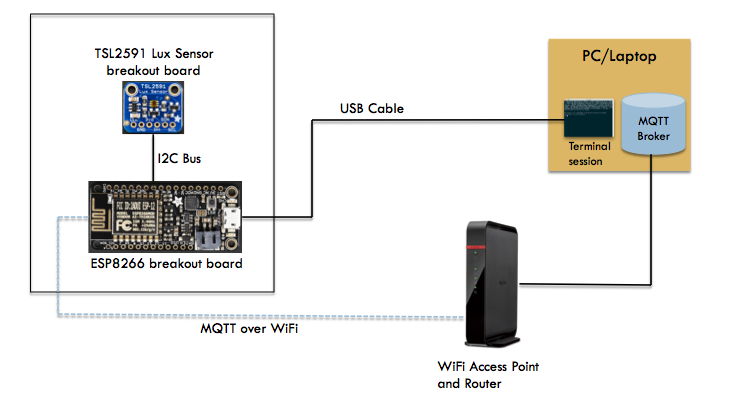
Finally, we will configure the ESP8266 to start our software upon reboot. Here is a block diagram of the completed system:
GitHub Repository
Example code and the source for this documentation are available in a GitHub repository at: https://github.com/jfischer/micropython-iot-hackathon.
Outline of this Document
We cover the construction and programming of the system starting with the parts you need and moving toward end-to-end applications. The following topics are covered:
- 2. Required (and Recommended) Parts and Tools - the parts you will need to find/purchase and the tools required to build and debug the system.
- 3. Hardware Assembly - connect a light sensor up to the ESP8266.
- 4. Software and Firmware Install - install firmware and interact with the board over a USB connection.
- 5. ThingFlow Application - use the ThingFlow framework to build a simple light sensor sampling application.
- 6. Messaging with MQTT - use the MQTT protocol to send our sensor events over the wireless network.
- 7. Projects - we sketch out some follow-on projects involving additional sensors and larger applications. This is the jumping point for you to be creative and try out your own ideas.
- 8. Teachers’ Notes - some notes for instructors who are using the material as a template for a class.
- 9. Quick Software Setup - for fast software and firmware setup.
OK, now let’s get started with the parts and tools that you need.
| [1] | http://www.micropython.org |
| [2] | https://en.wikipedia.org/wiki/ESP8266 |
| [3] | http://cache.nxp.com/documents/user_manual/UM10204.pdf |